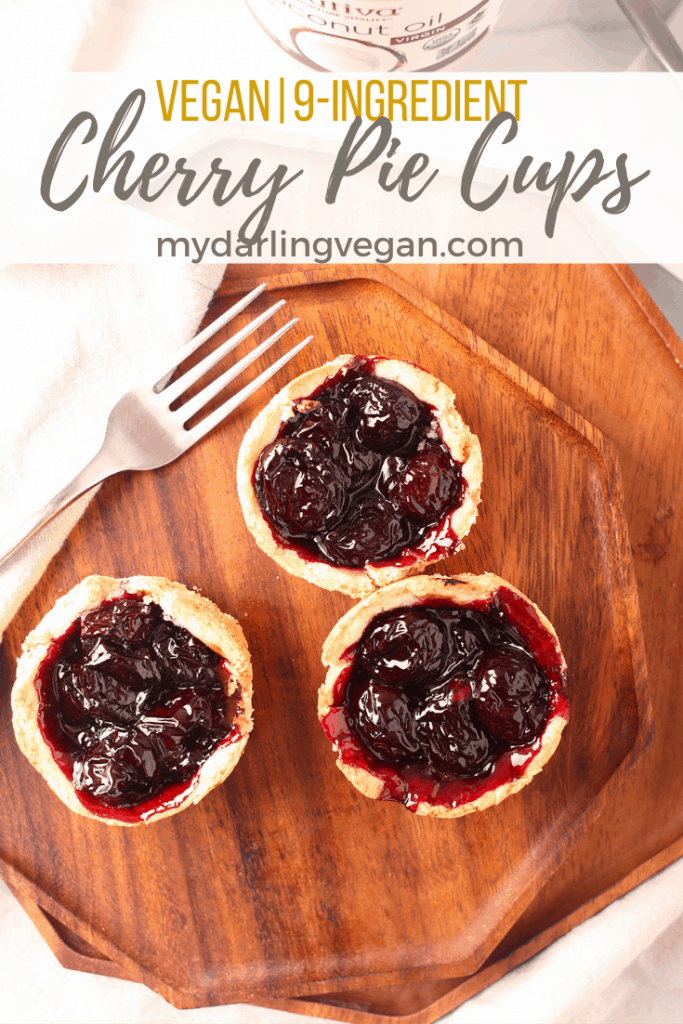
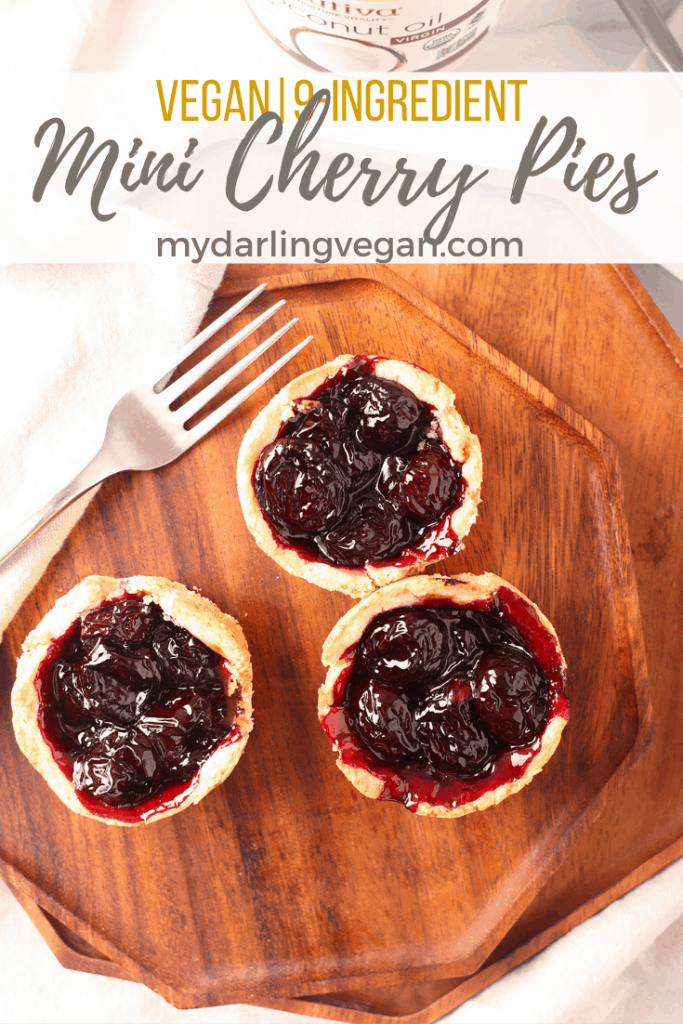
These sweet-tart Vegan Cherry Pie Cups are perfectly portioned for outdoor potlucks and barbeques but good luck eating just one! Their buttery flaky crusts and easy made-from-scratch filling make these mini pies downright addictive.
Disclosure: This post may contain affiliate links.
This post was sponsored by iHerb. All thoughts and opinions are 100% mine.
Spring is in full force and dining al fresco with friends seems like the way to celebrate. These miniature treats are the perfect way to round out any warm weather meal. They are a delightful addition to any grill-out or picnic spread. Not only are they adorable and delicious, but they're also pre-portioned! No need to dirty a knife or worry about slices with unequal filling - everything is perfectly self contained and ready to serve.
As an added bonus, making muffin-tin cherry pie cups means you don't have to stress about your dough tearing! If you're new to making pies or the thought of making a pie crust from scratch stresses you out, this is the perfect way to ease yourself in.
Oh, and even though you're making these mini cherry pies from scratch the entire recipe calls for under 10, real, wholesome ingredients. You'd be hard pressed to find a can of cherry pie filling with that short of a list! And if that wasn't convincing enough, the entire recipe can be completed from start to finish in just 45 minutes.
You've got this!
Recommended Ingredients & Equipment
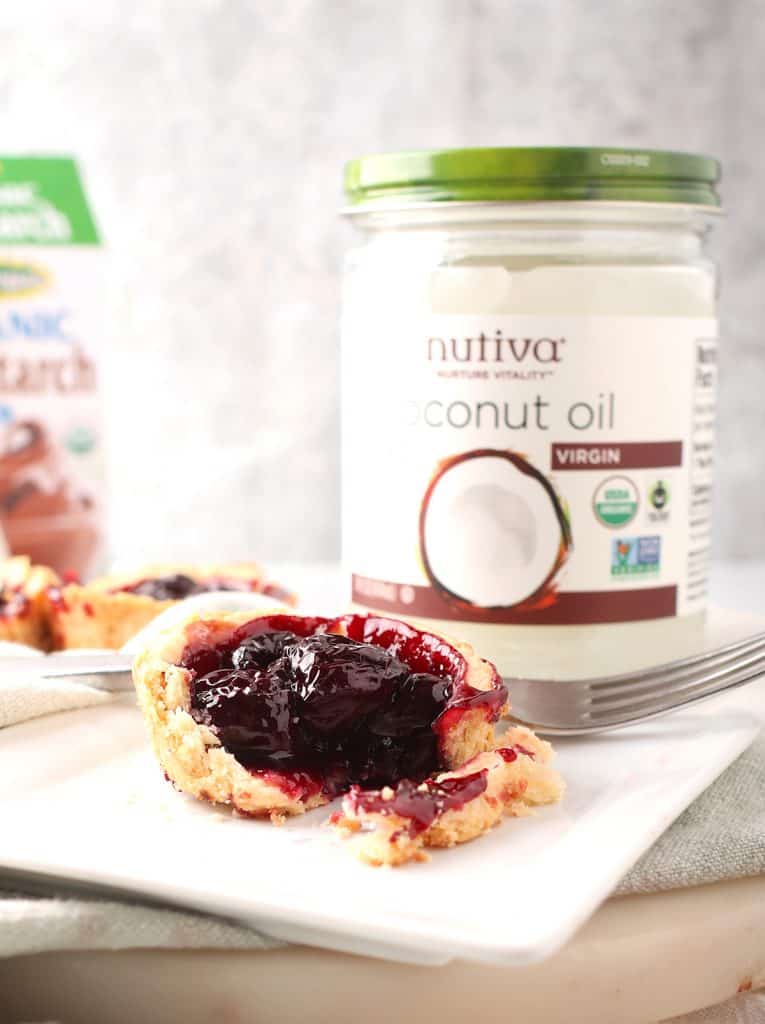
Making homemade vegan cherry pie is much simpler than you might think. To make this dessert even more convenient, I got most of my ingredients for this recipe at iHerb. That's groceries shipped right to my door! It doesn't get easier than that.
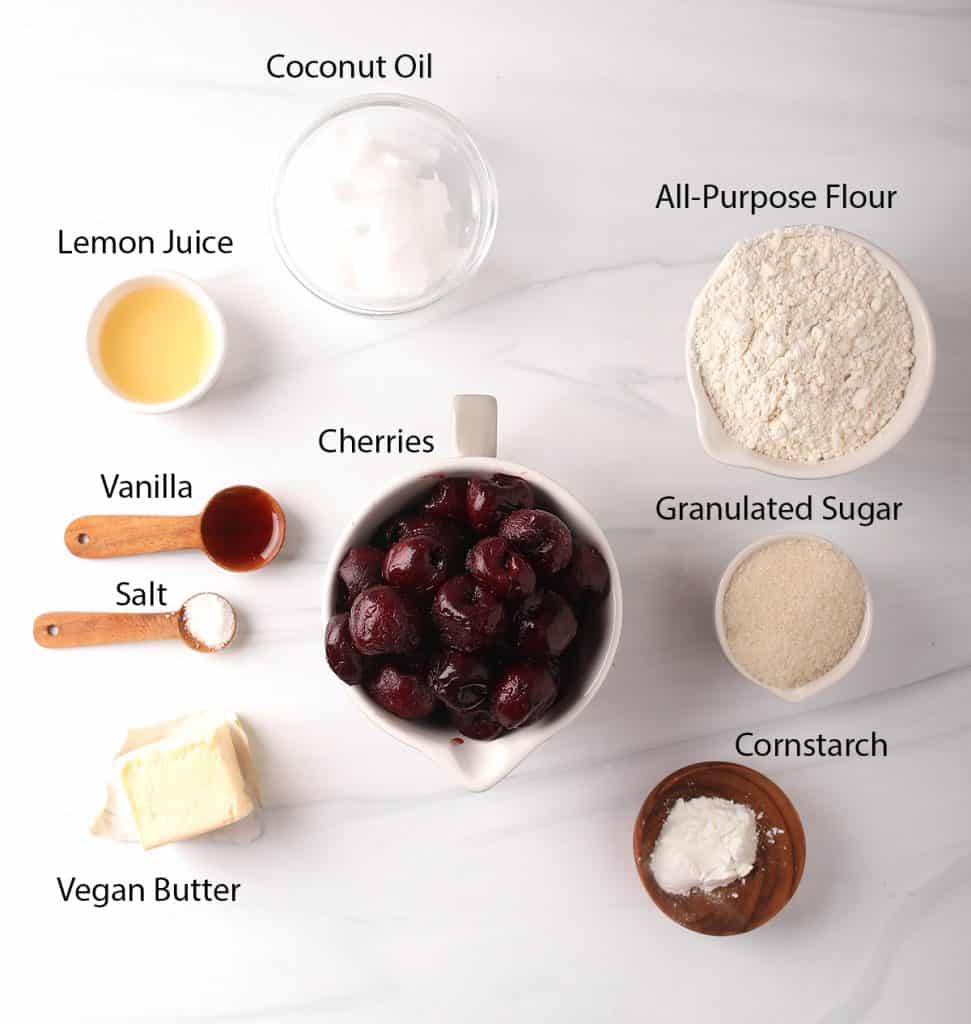
Here is everything you need.
Ingredient Notes
- Cherries - Feel free to use any variety of fresh or frozen cherries for this recipe, so long as they are pitted. If you opt for fresh cherries, I highly suggest using a cherry pitter to save you major time and frustration.
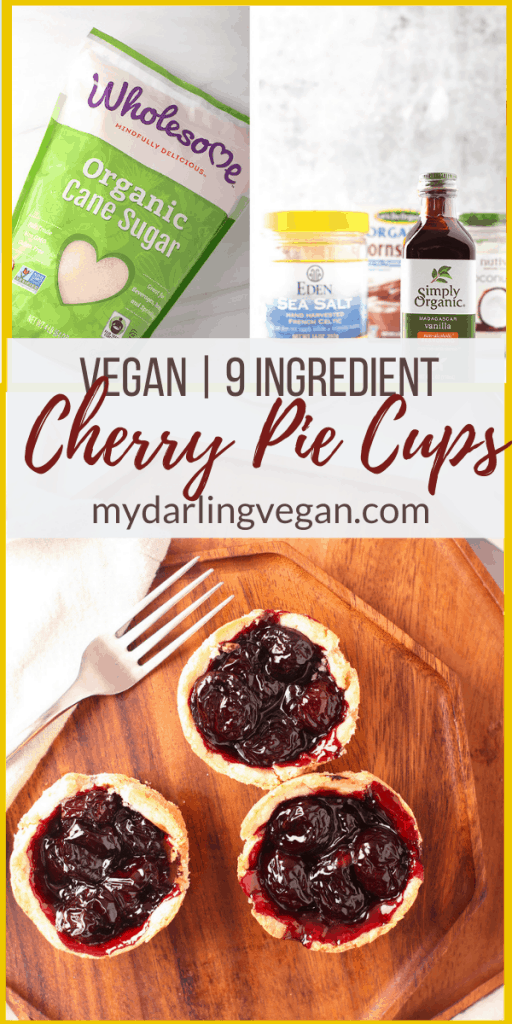
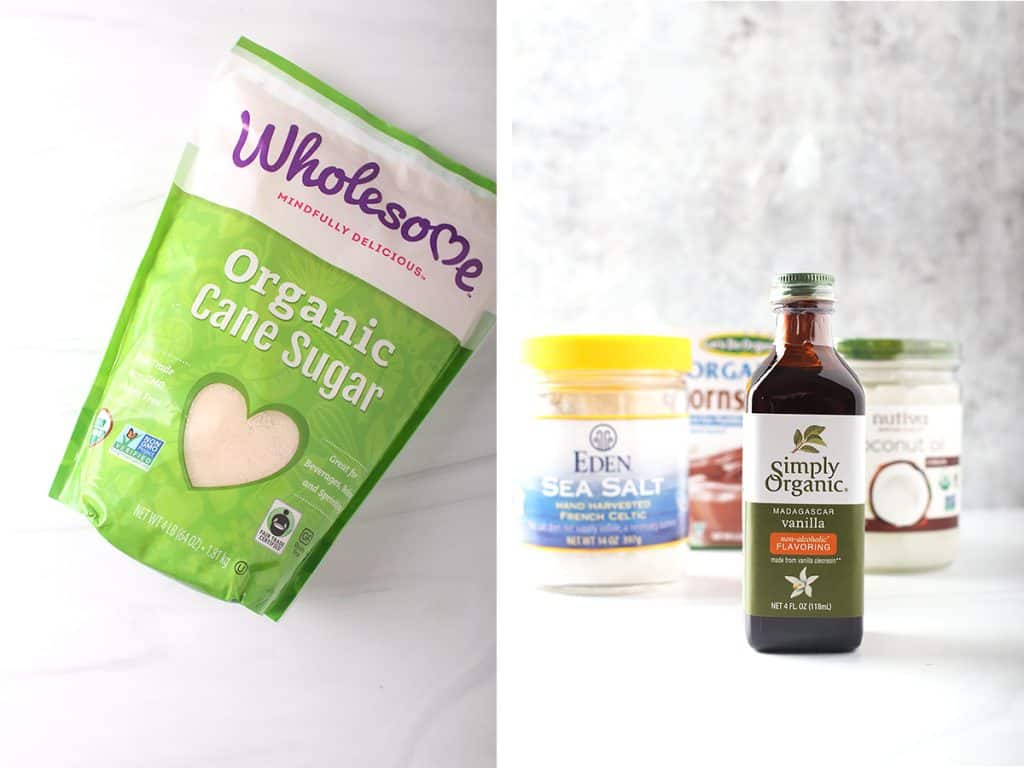
- Sugar - I used plain granulated sugar for this recipe. My sugar of choice is Wholesome Organic Cane Sugar which is 100% vegan!
- Cornstarch - If you want your pie filling to have a luxurious, velvety texture, you're going to need a thickener. I recommend Edward & Sons Cornstarch for this recipe.
- Vanilla - Use pure vanilla extract for the best results. I recommend trying Simply Organic Madagascar Vanilla. For a fun flavor twist, you can also sub in ½ teaspoon of almond extract instead.
- Salt - While you might not feel like you need salt in a dessert, trust me when I say a little bit can make the difference between a ho-hum dessert and a spectacular one. I recommend Eden Foods Sea Salt.
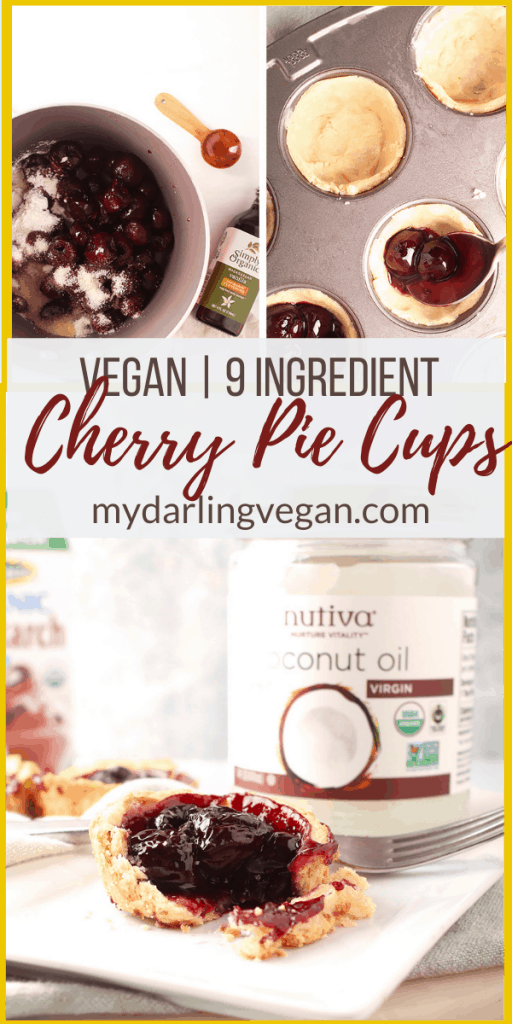
- Coconut Oil - I use Nutiva Organic Coconut Oil which is used in place of shortening to make your pie crust perfectly flaky. Make sure your coconut oil is chilled and solid.
- All Purpose Flour - If you're gluten free, feel free to swap in a cup-for-cup gluten free mix instead.
What is iHerb?
iHerb is an online store filled with over 30,000 natural and organic products ranging from home, beauty, food, pets, supplements, personal care, and more.
iHerb carries top-quality brands – ones that you probably recognize – and ships from climate-controlled distribution centers to ensure quality products to over 180 countries around the world!
Not only do they have everything I want, but also their shipping is fast and their prices are great. iHerb is convenient, affordable, and I am certain to get top-quality ingredients. Give it a try and grab the ingredients you need for this mini cherry pie recipe!
How iHerb Works
Picking out items at iHerb is super easy. Because they only carry the best brands, you don’t have to look through a lot of products to find the good ones. Simply type in what you’re looking for in the search bar and review your selections.
Once you fill up your cart, review it, select shipping and payment methods, and you’re good to go. iHerb offers customer service 7 days a week in 10 different languages, making it an easy and convenient online shopping experience.
Mini Grocery Haul
One of the best features of iHerb is the Vegan Grocery Section which is filled with over 1000 vegan groceries. I love to shop for many of my non-perishable foods here. By shopping in the vegan grocery section of iHerb, I can grab my favorite snacks and staples without having to spend time reading all the ingredients. And from the comfort of my own home. It’s a win-win!
This past mini grocery haul included some of my favorite items such as:
- Bob's Red Mill Almond Flour
- Now Foods Organic Maple Syrup
- Simple Mills Almond Flour Cookies
- Peanut Butter & Co. Crunchy Peanut Butter
I highly recommend trying iHerb for yourself. New AND returning customers will get a discount off their iHerb order with no minimum purchase. Just click the link above.
Step-by-Step Instructions
If you've never made a homemade pie before, you can follow along with these super easy step-by-step instructions. You're going to be a pie pro in no time!!
Step One - Make the Pie Dough
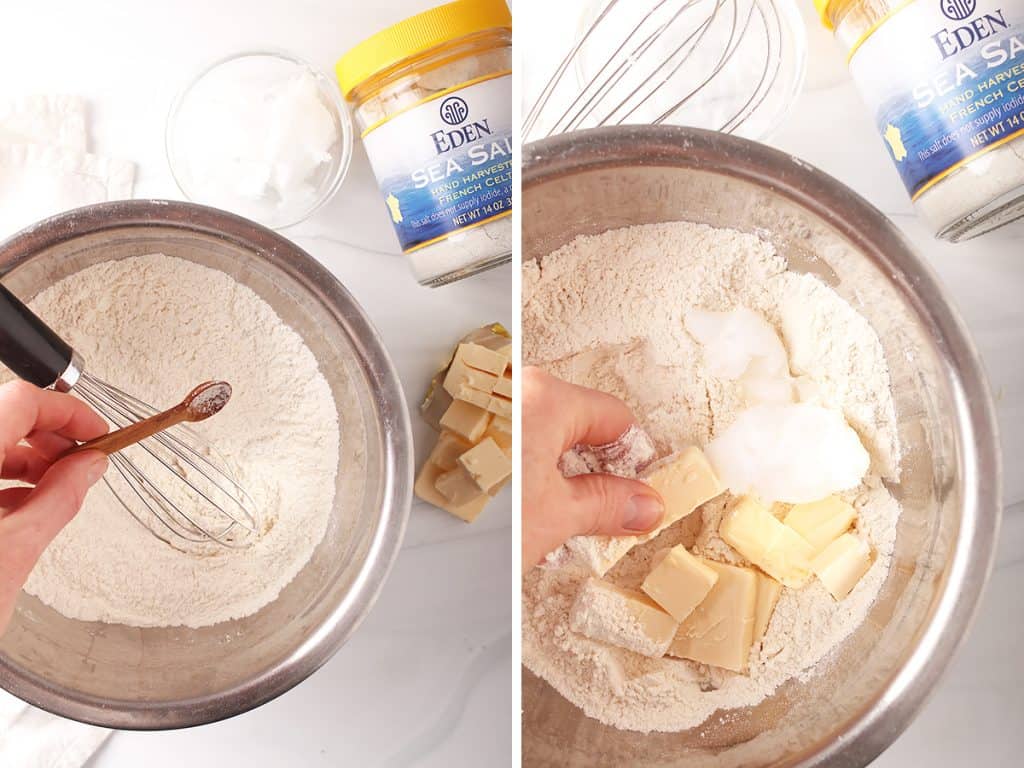
In a small bowl, combine the flour, sugar, and salt. Cut the butter and coconut oil in small pieces – about 1 tablespoon in size – and add to the dry ingredients. Using your hands or a pastry cutter, press the butter and coconut oil into the flour until the fats are evenly distributed and the dough resembles small pea-size pieces.
Dribble 1 tablespoon of ice water over the flour mixer and kneed together with your hands. Add water as necessary. You want a fairly dry dough (this creates the flakiness) but that has enough moisture to roll out and shape.
Pro Tip: Add just enough water to allow your pie crust to come together. We don’t want overly moist crusts. Wetter pie crusts are easier to work with, but the drier it is, the flakier (aka, more delicious) your pie crust will be.
Place the dough onto a piece of floured parchment paper and roll it out until your dough is about ⅛" thick. Place in the refrigerator and chill for 30 minutes.
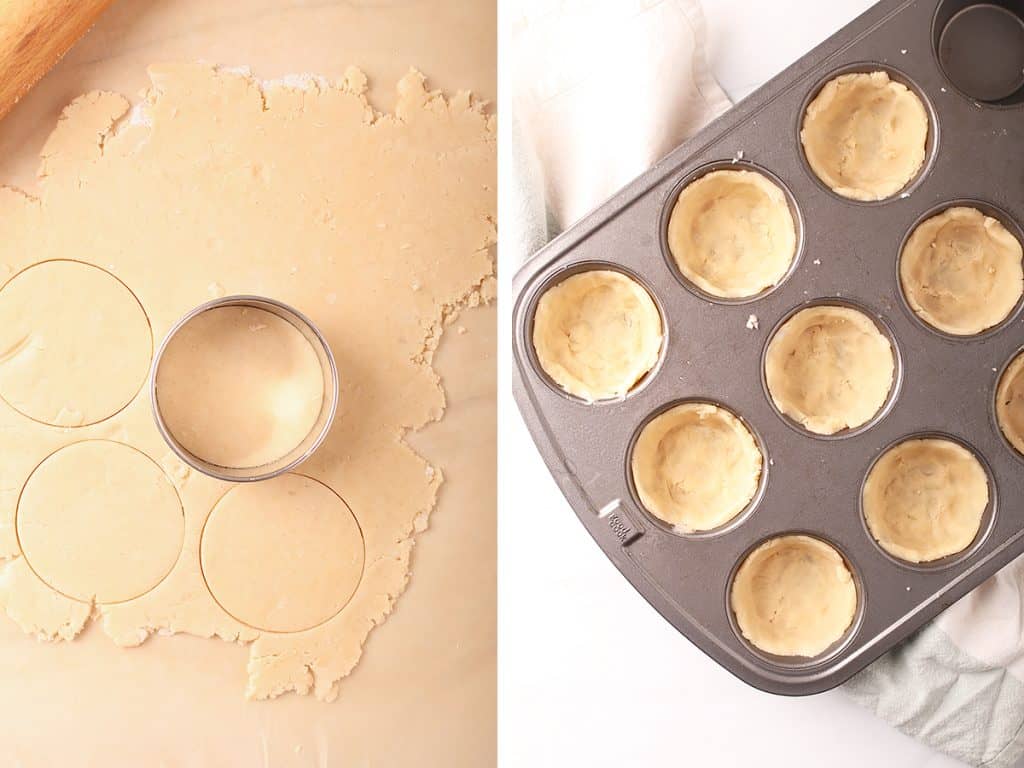
Using a 5" circle cutter, cut circles in the dough, cutting them as close as possible. Reroll the scraps and continue cutting circles until you have 18 rounds.
Pro Tip: The more you have to re-roll the dough, the less flaky it will be. Try and keep your re-rolls to a minimum!
Fit the rounds into 18 ungreased muffin cups, pressing in gently. Return to the refrigerator while making the filling.
Step Two - Make the Filling

Combine all the ingredients for the filling in a large saucepan over medium heat and bring to a boil. Reduce heat to a simmer and simmer for 5 minutes, stirring occasionally, until the cherries are tender and the juices have thickened.
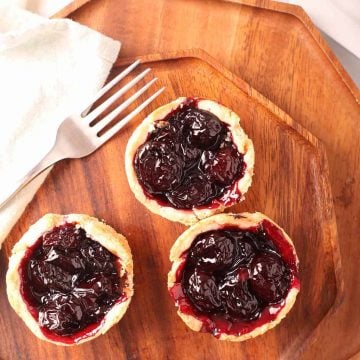
Evenly divide the filling (about 2 tablespoons per cup) into the chilled dough. Bake for 15 minutes, uncovered, or until the cherries are bubbling up and the dough is golden brown. Remove from the oven and let sit for 30 minutes before serving.
Serving and Storing
Serving - One of the best parts about these mini cherry pie cups is that they're perfect to let everyone serve themselves! They're delicious at room temperature or slightly warm. Serve with coconut whipped cream or a scoop of vegan ice cream.
Storing - Tightly wrap any leftover pies and store them at room temperature for up to 5 days. You can also freeze leftover pie to be enjoyed for up to 2 months. When ready to serve, let the pie thaw completely in the refrigerator by placing it in there the night before.
Tips and Tricks
- Make sure to use chilled coconut oil. This is used in place of shortening. If your coconut oil is not properly chilled, you won’t have a flaky crust.
- When possible, opt for fresh fruit. However, when fresh cherries are not possible, frozen cherries can be substituted. To use frozen, place the cherries in a colander and run them under room temperature water, breaking them up with your fingers. Let the cherries sit in the colander for at least 30 minutes so all the water has drained from them. If they are still wet, they will add liquid to your filling and it won't properly set. Gently pat the cherries dry with a paper towel before mixing them with sugar and cornstarch.
- Use high quality ingredients. Because this recipe calls for such few ingredients, it's important to use the best! Check out my ingredient recommendations under "Ingredient Notes" and take advantage of iHerb's discount for new AND returning customers.
Frequently Asked Questions
Absolutely! If you want to prepare this pie in advance but don’t want a soggy crust, you can prepare the filling and crust separately. Cherry pie filling can be:
Canned and stored for up to 12 months in a cool dark place
Frozen in an airtight container for up to two months in the freezer
Refrigerated in an airtight container for up to 3 days before assembling
Once baked and assembled, these mini pies should last for up to 5 days in the refrigerator. I recommend allowing them to come to room temperature (~2-3 hours) or warming them briefly in the oven before serving.
To ensure that the thickener properly activates, make sure to cook your pie until the juices are bubbling over. Cornstarch is activated in heat and won’t thicken unless the internal temperature reaches a boiling point. Your pie filling will continue to set as it cools, so let your pies cool completely before serving.
Sure! However, to preserve the integrity of the crusts, I recommend either freezing them in the muffin tin with a bit of flour or cornstarch sprinkled in before adding the crusts, or using silicone muffin liners. Wrap well in plastic wrap or aluminum, label and freeze for up to three months.
Vegan Cherry Pie Cups
Ingredients
Pie Crust
- 2 ½ cups all-purpose flour
- 1 tablespoon granulated sugar
- 1 tsp. salt
- 10 tbsp. vegan butter
- ½ cup coconut oil, chilled
- 3-4 tbsp. ice water
Cherry Filling
- 4 cups fresh or frozen cherries, pitted
- ½ cup granulated sugar
- 2 tablespoon cornstarch
- 2 tablespoon lemon juice
- 1 tsp. vanilla extract
- ¼ tsp salt
Instructions
- In a small bowl, combine the flour, sugar, and salt. Cut the butter and coconut oil in small pieces – about 1 tablespoon in size – and add to the dry ingredients. Using your hands or a pastry cutter, press the butter and coconut oil into the flour until the fats are evenly distributed and the dough resembles small pea-size pieces. Dribble 1 tablespoon of ice water over the flour mixer and kneed together with your hands. Add water as necessary. You want a fairly dry dough (this creates the flakiness) but that has enough moisture to roll out and shape. Place the dough onto a piece of floured parchment paper and roll it out until your dough is about ⅛" thick. Place in the refrigerator and chill for 30 minutes.
- Using a 5" circle cutter, cut circles in the dough, cutting them as close as possible. Reroll the scraps and continue cutting circles until you have 18 rounds. Fit the rounds into 18 ungreased muffin cups, pressing in gently. Return to the refrigerator while making the filling.
- Preheat the oven to 425F. Combine all the ingredients for the filling in a large saucepan over medium heat. Bring to a boil. Reduce heat to a simmer and simmer for 5 minutes, stirring occasionally, until the cherries are tender and the juices have thickened.
- Evenly divided the filling (about 2 tablespoons per cup) into the chilled dough. Bake for 15 minutes, uncovered until the cherries are bubbling up and the dough is golden brown. Remove from the oven and let sit for 30 minutes before serving. Serve with non-dairy ice cream of your choice.
Notes
- Make sure to use chilled coconut oil. This is used in place of shortening. If your coconut oil is not properly chilled, you won’t have a flaky crust.
- When possible, opt for fresh fruit. However, when fresh berries are not possible, frozen berries can be substituted. To use frozen, follow these tips:
- Place the cherries in a colander and run them under room temperature water, breaking them up with your fingers. This will allow the excess juices and water to run out.
- Let the cherries sit in the colander for at least 30 minutes so all the water has drained from them. If they are still wet, they will add liquid to your filling.
- Gently pat the cherries dry with a paper towel before mixing them with sugar and cornstarch.
 Hi, we’re Shayne and Kristina! I’m the chef and editor here at My Darling Vegan, and Kristina is the photographer and writer. Together we’re carrying on this space with the same focus on easy, flavorful vegan recipes that anyone can enjoy at home. Check out our
Leave a Reply